
As part of the preparations for the workshop on container security that myself and Iain Smart ran at this year’s Steelcon, there were some concerns that our standard option of SSH access might be blocked by the venue’s Wi-Fi, so a backup plan was in order. As a result, we were looking into how to provide a browser based terminal for students running on a host in AWS EC2.
After looking at various options, we decided to see if we could get code-server working. It’s a really nice project that provides a hosted version of VS Code, which gives you file exploring/editing, a terminal and port forwarding for local applications, all in a browser.
After the conference, I decided to extract the config into a stand-alone set of Ansible tasks, and put it into my Container Security Workstation repo. You can see the overall playbook here but we’ll go through the key parts in this post.
There were a couple of interesting technical aspects to getting it all working, which I thought I’d write-up here, in case it’s of use to other people!
Setting up an EC2 instance with Ansible
This is relatively straight-forward, but with one caveat, that Ansible changed the syntax of this, so if you have an older version of ansible this may not work. First up install the AWS ansible galaxy role ansible-galaxy collection install amazon.aws then have a block like this to setup the EC2 and wait for it to be available
- name: start an instance with a public IP address
  amazon.aws.ec2_instance:
    name: "Container Security Workstation"
    key_name: "{{ key_pair }}"
    vpc_subnet_id: "{{ subnet_id }}"
    region: "{{ region }}"
    instance_type: "{{ instance_type }}"
    security_group: "{{ security_group }}"
    network:
      assign_public_ip: true
    image_id: "{{ ami_id }}"
    wait_timeout: 60
    state: running
  register: ec2

- name: Add all instance public IPs to host group
  add_host: hostname={{ item.public_ip_address }} groups=ec2host
  loop: "{{ ec2.instances }}"

- name: Wait for SSH to be available
  delegate_to: "{{ item.public_ip_address }}"
  wait_for_connection:
    delay: 20
    timeout: 60
  with_items: "{{ ec2.instances }}"
A couple of key points to note for this. you’ll need a valid API connection to AWS with enough rights to create an EC2 instance. You’ll then need to have the information for the various variables here
key_pair- The name of an SSH key pair in your AWS account to use for access to the hostsubnet_id- The ID of the subnet to place the EC2 inregion- The region to useinstance_type- The EC2 instance type to usesecurity_group- A security group that exists in your AWS account which allows at least 22/TCP, probably also 443/TCP for Caddy.ami_id- the AMI ID to use for the host. In my case I use an ubuntu:22.04 based AMI.
Code Server Install and Config
The basic installation of Code server is pretty straight-forward. They provide a deb package, so we can just download and install that :-
  - name: Install Code Server
    get_url:
      url: https://github.com/coder/code-server/releases/download/v4.14.0/code-server_4.14.0_amd64.deb
      dest: /tmp/code-server.deb

  - name: Install Code Server
    apt:
      deb: /tmp/code-server.deb
      state: present

  - name: start code server
    systemd:
      name: code-server@ubuntu
      state: started
      enabled: yes
After that there’s a couple of configuration changes to make, first I wanted to move the port from 8080 to 18080 as I’ll often use 8080 for other things. Using Ansible’s lineinfile was a good way to do that, and pointing it at the default config file location in the user’s home directory. As we’re using an Ubuntu EC2 instance here, that’ll be /home/ubuntu.
  - name: Change port to 18080 in the code-server config file
    lineinfile:
      path: /home/ubuntu/.config/code-server/config.yaml
      regexp: '^bind-addr:'
      line: 'bind-addr: 127.0.0.1:18080'
You might notice that we’re still listening on 127.0.0.1 here, but we’ll get to making this accessible remotely in a bit!
Next up we want to change the password from the default value, of course. Code Server has different authentication options available, but for this purpose, a static password (assuming it’s suitably strong) should be fine.
  - name: Change password to the value of code_password in the code-server config file
    lineinfile:
      path: /home/ubuntu/.config/code-server/config.yaml
      regexp: '^password:'
      line: 'password: {{code_password}}'
This section just sets the password to whatever is held for the ansible var code_password.
Lastly for this section, we want to re-start the server, so our configuration changes take effect.
  - name: restart code server
    systemd:
      name: code-server@ubuntu
      state: restarted
      enabled: yes
Making it available remotely - Caddy!
I’ve mentioned before about how cool Caddy is for a variety of reasons, and we can make use of it here to expose the Code server over TLS. As a pre-requisite, this section uses an Ansible galaxy role, which can be installed with ansible-galaxy collection install maxhoesel.caddy. If you’re happy enough with SSH port-forwarding, that would be another option here.
We want to change the configuration of Caddy so that it’ll provide a reverse proxy from 127.0.0.1:18080 to 0.0.0.0:443 and set-up TLS
 - name: Setup the Caddy server
    include_role:
      name: maxhoesel.caddy.caddy_server
    vars:
      caddy_config_mode: "Caddyfile"
      caddy_caddyfile: |
        :443 {
          tls internal {
            on_demand
          }
          reverse_proxy :18080
        }

  - name: Restart Caddy
    systemd:
      name: caddy
      state: restarted
      enabled: yes
Extra Credit - Valid TLS cert
At this point you’ve got a configuration that’ll work, but the certificate won’t be trusted by the browser, which isn’t ideal (if only that you’ll need to click through a warning when you get to it). We can get TLS certificates issued on demand using Lets encrypt and Caddy which has a very neat trick of provisioning these on the fly, we just need a valid DNS record for the host.
Of course you could do this manually after set-up, but it’d be neat to have it provisioned automatically. Here we just need a DNS provider that’s got an API and, ideally, Ansible integration. Fortunately the DNS provider I use DNSimple has both of these things!
First up we need to register our DNS record. This process will vary depending on your provider but the general concepts will likely remain. You’ll need an API key for the provider and a domain to host at. The task below sets up a host called csw and a domain specified as the var dns_domain and sets the A record to point to inventory_hostname which should be the external IP address of the EC2 we’ve started.
  - name: Authenticate to DNSimple & Create Record
    community.general.dnsimple:
      account_email: "{{ dnsimple_account_email }}"
      account_api_token: "{{ dnsimple_api_key }}"
      domain: "{{ dns_domain }}"
      type: A
      # Change as needed
      record: csw
      solo: yes
      ttl: 360
      value: "{{inventory_hostname}}"
      state: present
    delegate_to: localhost
    register: dns_record
Now we’ve got a valid DNS record, we just need to re-write the Caddyfile that we’re using so that Caddy will provision a cert for us on access. These tasks remove the old Caddyfile, add a new one specifying our host and domain and setting up TLS and then re-start Caddy.
  - name: remove old Caddy Config
    file:
      path: /etc/caddy/Caddyfile
      state: absent

  - name: Add caddyfile contents
    copy:
      dest: /etc/caddy/Caddyfile
      content: |
        csw.{{dns_domain}}:443 {
          tls {{dnsimple_account_email}}
          reverse_proxy :18080
        }

  - name: Restart Caddy
    systemd:
      name: caddy
      state: restarted
      enabled: yes
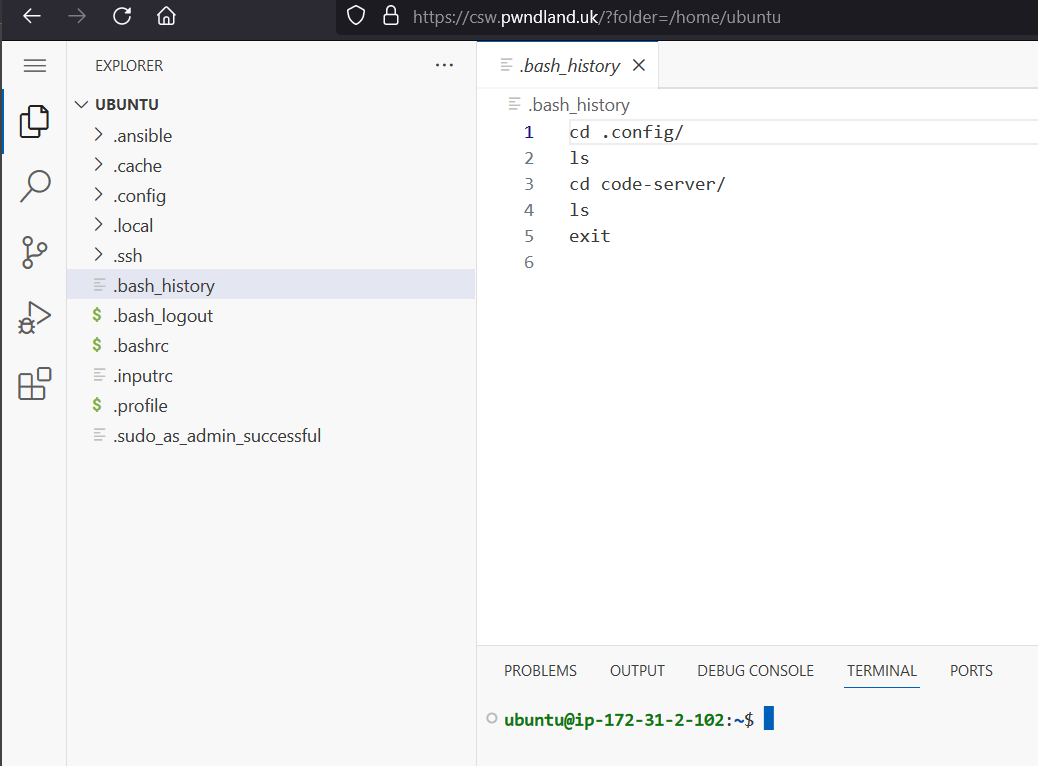
If all works, once you’ve run your playbook, it should look something like this :-
Conclusion
At the end of all this you should have a nice Web hosted development/testing environment with a terminal and port-forwarding, which could be handy for a number of reasons.
